

Prerequisite: The instance must be in a running state before you can manage its users.To manage the same users programmatically, see the Database users API.
Opening the User Access Tab
- Go to app.falkordb.cloud and sign in.
- Select your instance from the list.
- Click the User Access tab on the instance detail page.
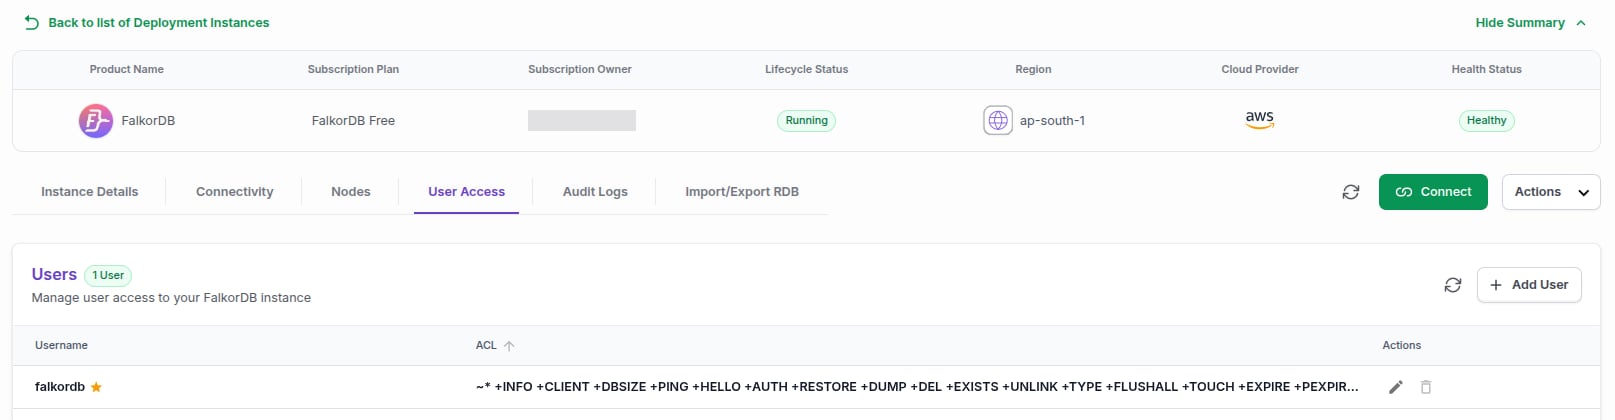
If you don’t see the User Access tab, your instance was created on an older version of its tier. Contact support@falkordb.com to have it upgraded.
Default User
Every instance has a default user that is created automatically during deployment. It’s marked with a star in the Users table. This user can’t be deleted or renamed. You can change its password or role with the Edit icon, like any other user.Creating a User
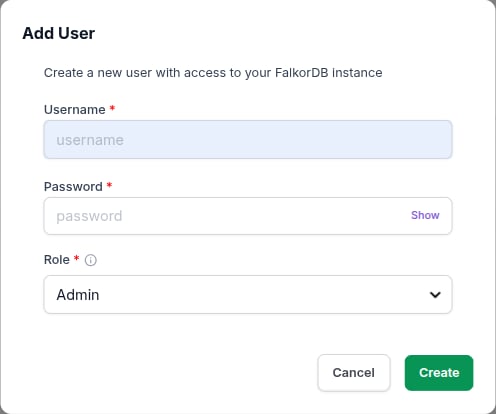
- From the User Access tab, click Add User.
-
Fill in the required fields:
- Username — the login name for the new user.
- Password — a secure password for the user.
-
Under Role, choose a built-in role or Custom. The role starts as Admin, so change it if the user needs less access:
Admin— full read/write access and operations.Read— read-only access to graphs.Write— full read/write access to graphs.Custom— set the permissions yourself:- Key Patterns — the keys the user can access, for example
~*for all keys. - Commands — choose commands from the list, or type them, for example
+GRAPH.RO_QUERY. See ACL for the rule syntax.
- Key Patterns — the keys the user can access, for example
- Select Create to create the user.
Updating a User
- From the User Access tab, locate the user you want to update in the table.
- Click the Edit (pencil) icon next to the user.
- Change the Password, Role, or custom permissions as needed. Leave the password blank to keep the current one.
- Select Update to apply the changes.
Deleting a User
- From the User Access tab, locate the user you want to remove.
- Click the Delete (trash) icon next to the user.
- Confirm the deletion in the dialog that appears.
The default user cannot be deleted.
Frequently Asked Questions
Can I delete the default user?
Can I delete the default user?
No. The default user is created during deployment and can’t be deleted or renamed. You can still change its password or role with the Edit icon.
What roles are available?
What roles are available?
Three built-in roles are available: Read (graph read access only), Write (full graph read/write), and Admin (every allowed command, including administrative ones such as
FLUSHALL and GRAPH.CONFIG). No built-in role lets a database user manage other database users.How do I apply fine-grained access control?
How do I apply fine-grained access control?
Select the Custom role when creating or editing a user, then set the Key Patterns and Commands. See the ACL command reference for the full rule syntax.
Does the instance need to be running to manage users?
Does the instance need to be running to manage users?
Yes. The instance must be in a running state before you can open the User Access tab and make changes.
Can I change a user's password after creation?
Can I change a user's password after creation?
Yes. Click the Edit icon next to the user in the User Access tab, enter a new password, and select Update.